
大家好,我是超哥。今天教大家在用 OpenClaw + Ollama 部署 谷歌 Gemma 4 本地 AI,不需要 API、完全免费、离线也能用,跟着教程几分钟就能搭好。

一、安装Windows Terminal
Windows 终端程序是一款新式、快速、高效、强大且高效的终端应用程序,适用于命令行工具和命令提示符,PowerShell和 WSL 等 Shell 用户。主要功能包括多个选项卡、窗格、Unicode、和 UTF-8 字符支持,GPU 加速文本渲染引擎以及自定义主题、样式和配置。
下载地址:https://apps.microsoft.com/detail/9n0dx20hk701?hl=zh-CN&gl=CN
二、安装 WSL
在 PowerShell(管理员)执行安装WSL命令:
wsl --install
安装完成后重启电脑,然后安装Ubuntu命令:
wsl --install -d Ubuntu
打开Windows Terminal,来到ubuntu
三、查看显卡驱动状态
查看显卡驱动状态命令:
nvidia-smi
四、更新Ubuntu系统
更新Ubuntu系统命令:
sudo apt update
sudo apt upgrade -y
五、安装环境
1. 安装 Python
安装 Python命令:
sudo apt install python3-pip python3-venv -y
2. 安装解压缩软件
安装解压缩软件命令:
sudo apt install -y zstd
3. 安装nodejs
安装 nodejs 命令:
curl -fsSL https://deb.nodesource.com/setup_22.x | sudo -E bash -
sudo apt install -y nodejs
4. 安装 Git
安装 Git 命令:
sudo apt update
sudo apt install -y git
检查有没有成功:
node -v
npm -v
git --version
六、安装ollama

ollama官网:https://ollama.com/
安装 ollama 命令:
curl -fsSL https://ollama.com/install.sh | sh
七、下载安装Ollama Gemma 4 AI模型
Ollama Gemma 4 模型列表:https://ollama.com/library/gemma4
Gemma 4官方介绍:https://deepmind.google/models/gemma/gemma-4/
| 模型 | 模型文件大小 | 最小GPU显存 | 建议显存 |
| gemma4:e2b | 7.2GB | 4GB | 8GB |
| gemma4:e4b | 9.6GB | 6GB | 8-12GB |
| gemma4:26b | 18GB | 18GB | 24GB |
| gemma4:31b | 20GB | 20GB | 24GB+ |
gemma4:e2b 安装命令:
ollama run gemma4:e2b
gemma4:e4b 安装命令:
ollama run gemma4:e4b
gemma4:26b 安装命令:
ollama run gemma4:26b
gemma4:31b 安装命令:
ollama run gemma4:31b
八、安装配置openclaw
openclaw官网:https://openclaw.ai
安装配置 openclaw 命令:
curl -fsSL https://openclaw.ai/install.sh | bash
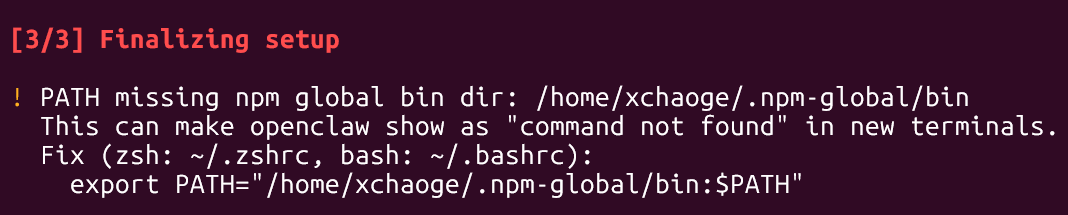
如果报下图中的错误,执行下面命令(没有报错不执行):
echo 'export PATH="$HOME/.npm-global/bin:$PATH"' >> ~/.bashrc && source ~/.bashrc
九、启动测试openclaw
启动openclaw命令:
openclaw tui
创建html命令:
在本地创建一个html文件,内容是Hello X超哥,页面要漂亮。
生成文件的路径,其中xchaoge换成你们自己的名称:
\\wsl$\Ubuntu\home\xchaoge
十、常用命令:
退出命令行聊天:Ctrl+D
重新配置openclaw命令:openclaw onboard